How to create, modify, and delete a VDC
When to use
Use this procedure when allocating part of a cluster to a new consumer, changing their allocated capacity, or decommissioning a VDC. All three operations on the VDC itself are available only to the cluster-level Cluster master role. A VDC-level role cannot perform these operations: vStack Center rejects the request.
This guide covers the entire lifecycle in sequence. If you need a VDC with its own block storage, first create the VDC using this guide, then enable storage. See Creating a VDC with Unified Storage.
Prerequisites
- The Cluster master role.
- Access to the vStack Center web interface.
- vStack Center version 3.0.3.
- For deletion, a VDC with all objects removed: networks unassigned, ports disconnected, VMs and datasets deleted, and volumes and owned OS images removed (for details on rejections, see Troubleshooting).
Creating a VDC
There is one required field: the name, from 1 to 255 characters long. Quotas are optional at this step: the VDC is created without limits, and quotas can be set later by editing it.
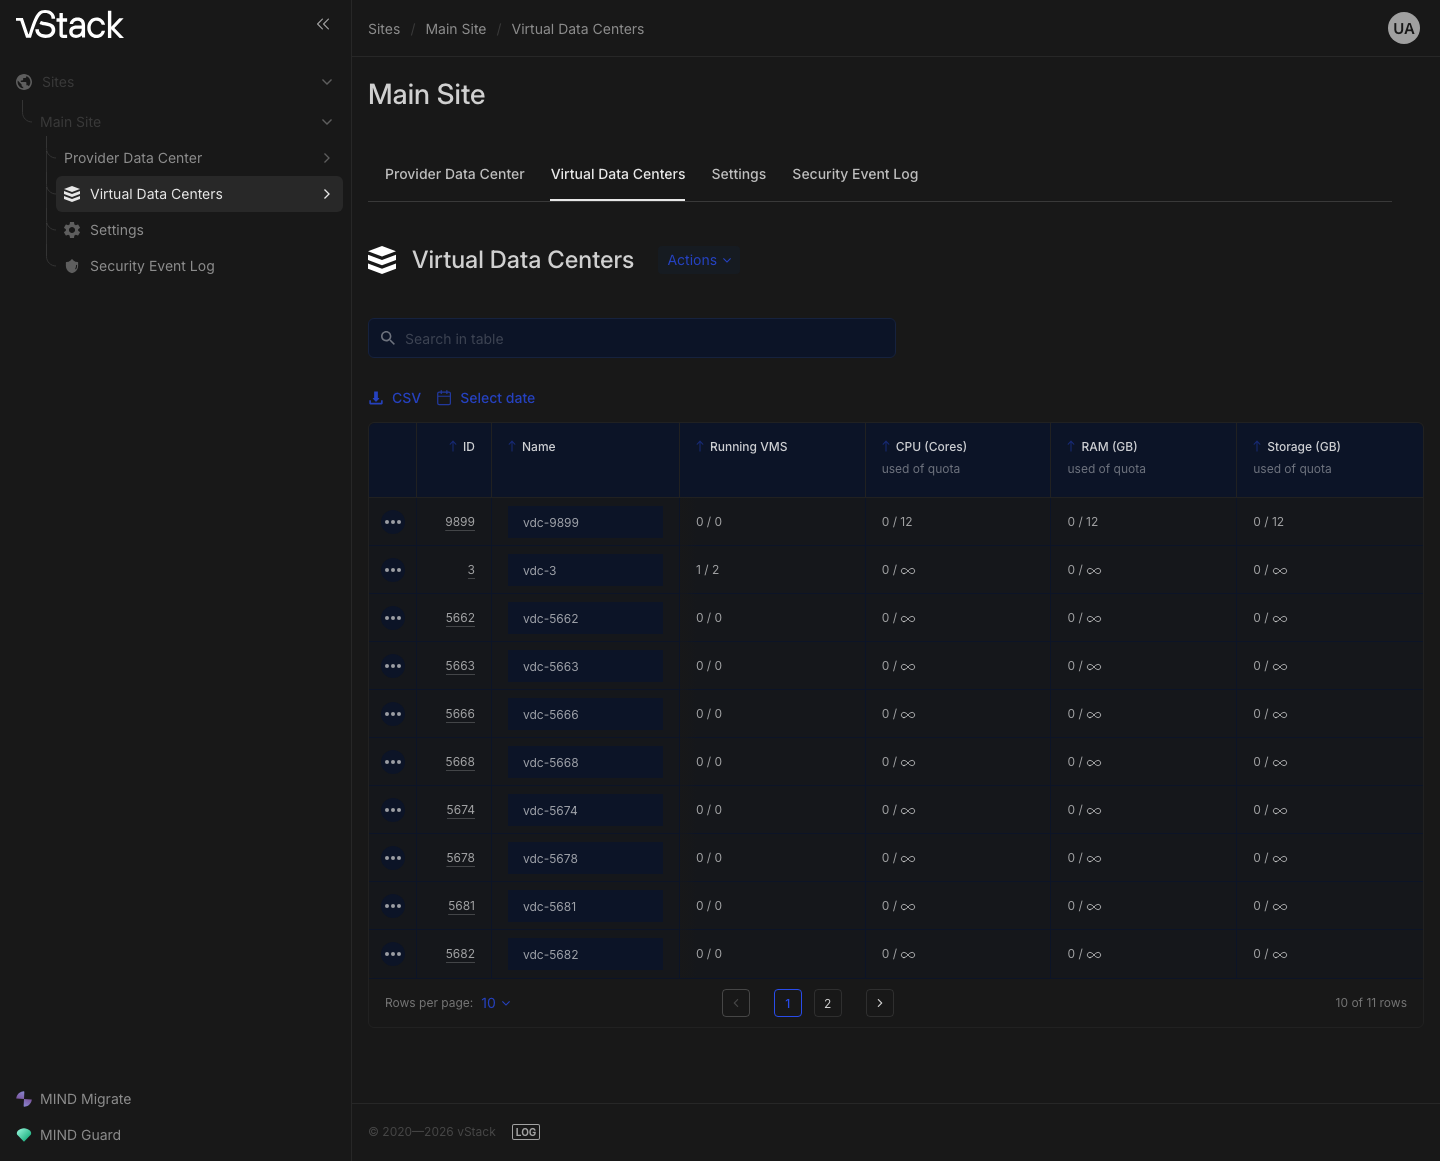
- Open the site and go to the Virtual Data Centers tab. The same section is available from the navigation tree in the sidebar.
- Click Actions and select Create a VDC.
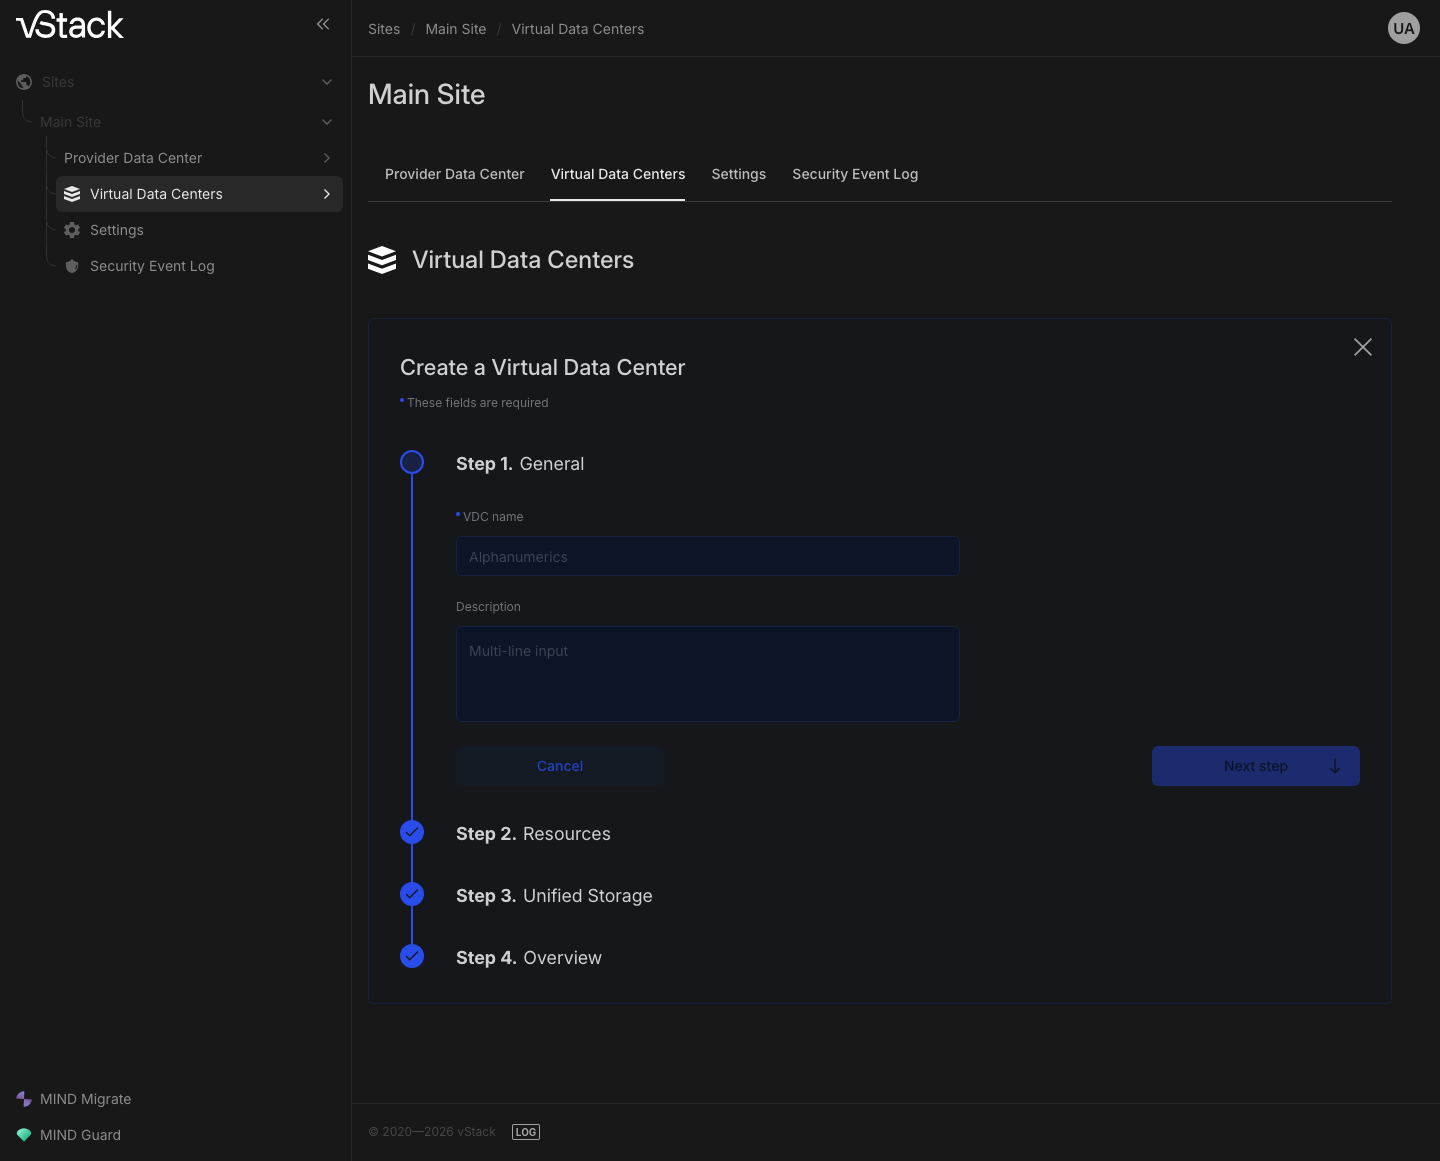
- On step 1, General, of the Create a Virtual Data Center dialog, enter a name in the VDC name field. It is required, with the hint Alphanumerics below it. Below that is the optional multiline Description field. The Next step button remains disabled until you enter a name.
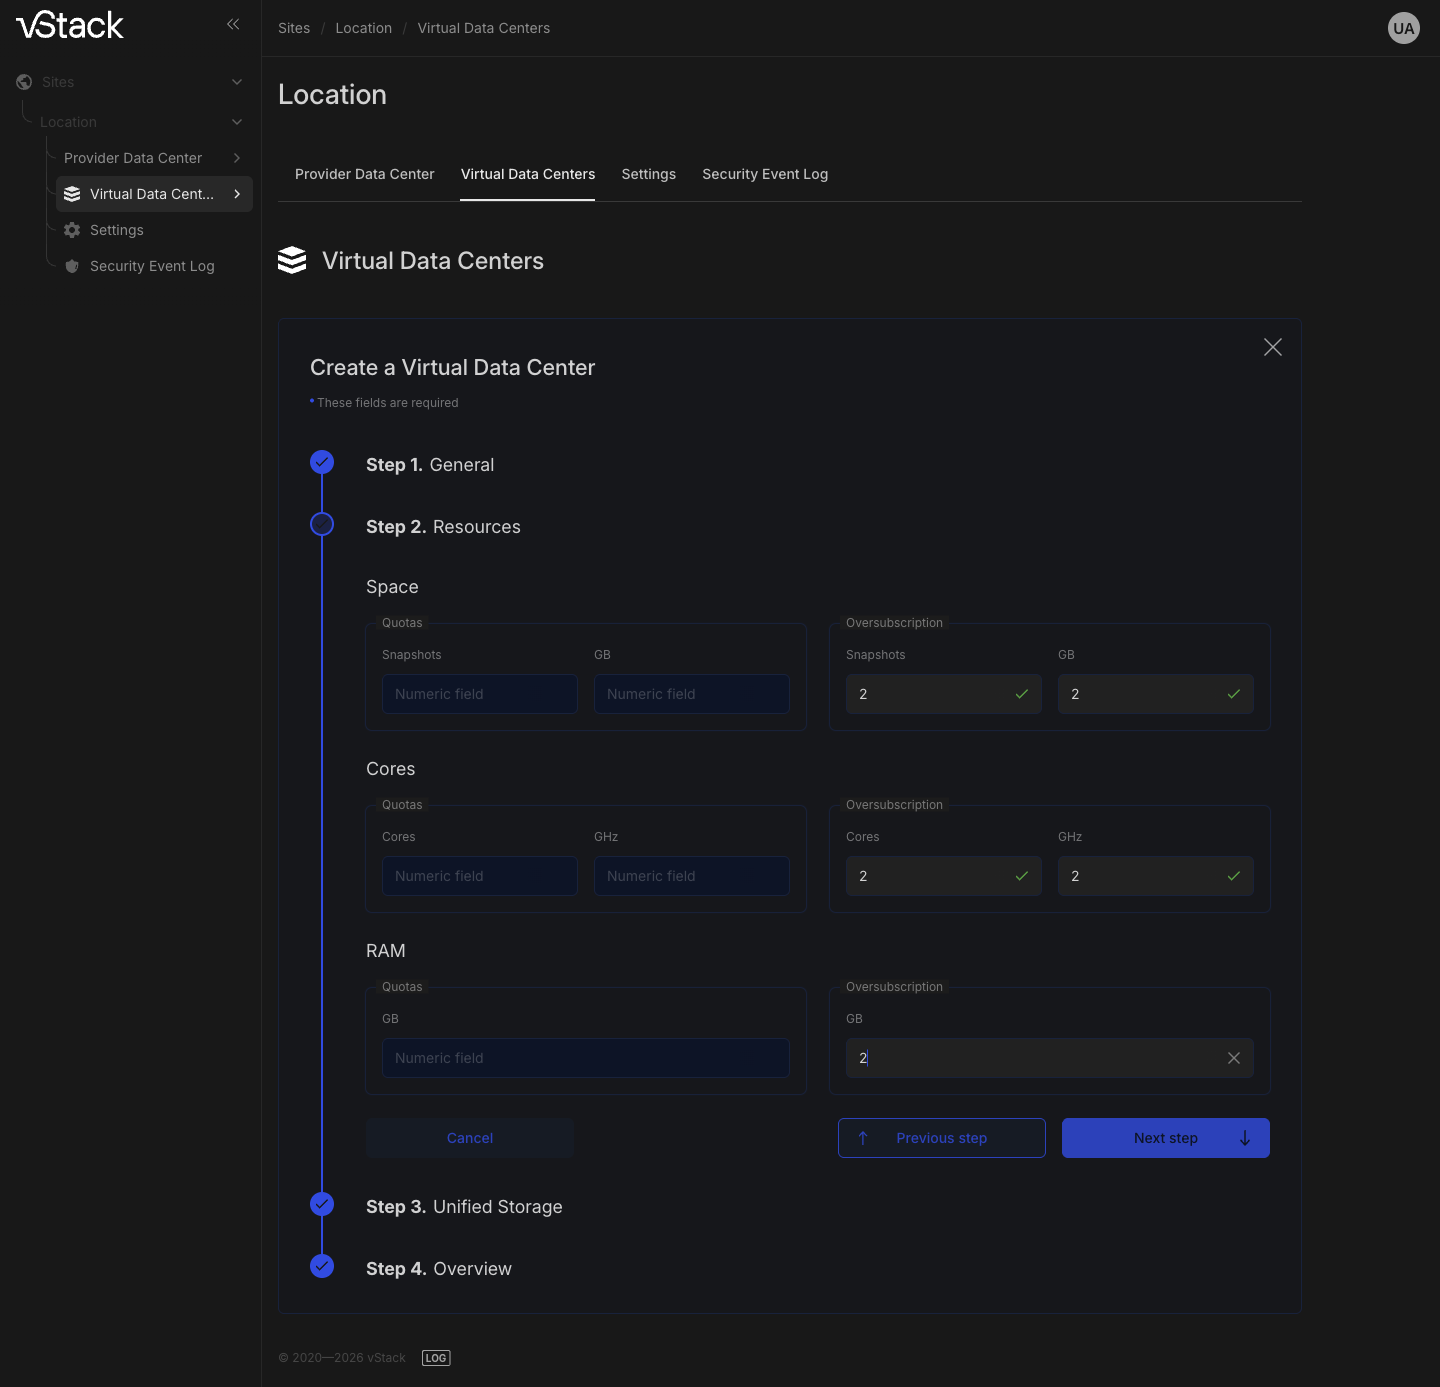
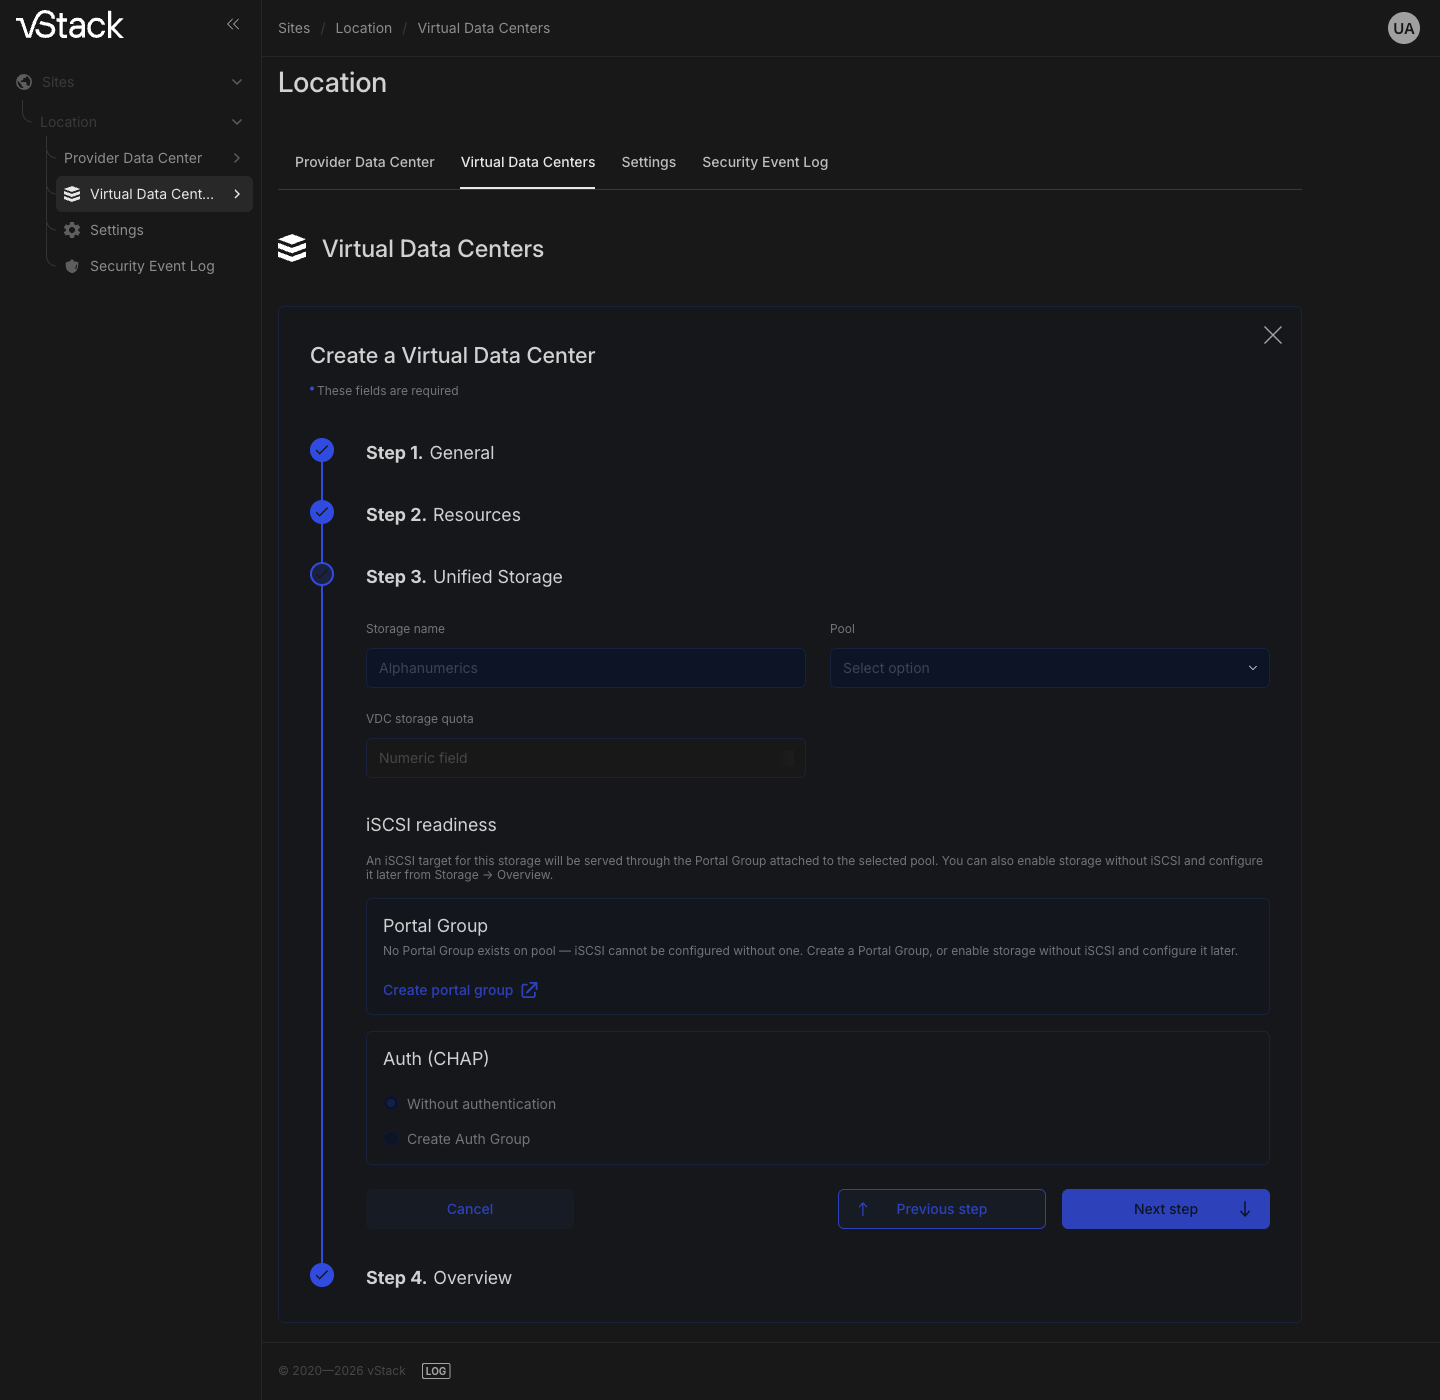
- Click Next step and complete the remaining wizard steps: Resources for quotas and oversubscription factors, Unified Storage for VDC block storage, and Overview for the summary before creation. You can leave the quota fields empty. The Cancel button closes the dialog without creating a VDC.
- Confirm creation on the Overview step.
- Verify that the new VDC appears in the table. Its columns are ID, Name, Running VMS, CPU (Cores) used of quota, RAM (GB) used of quota, and Storage (GB) used of quota.
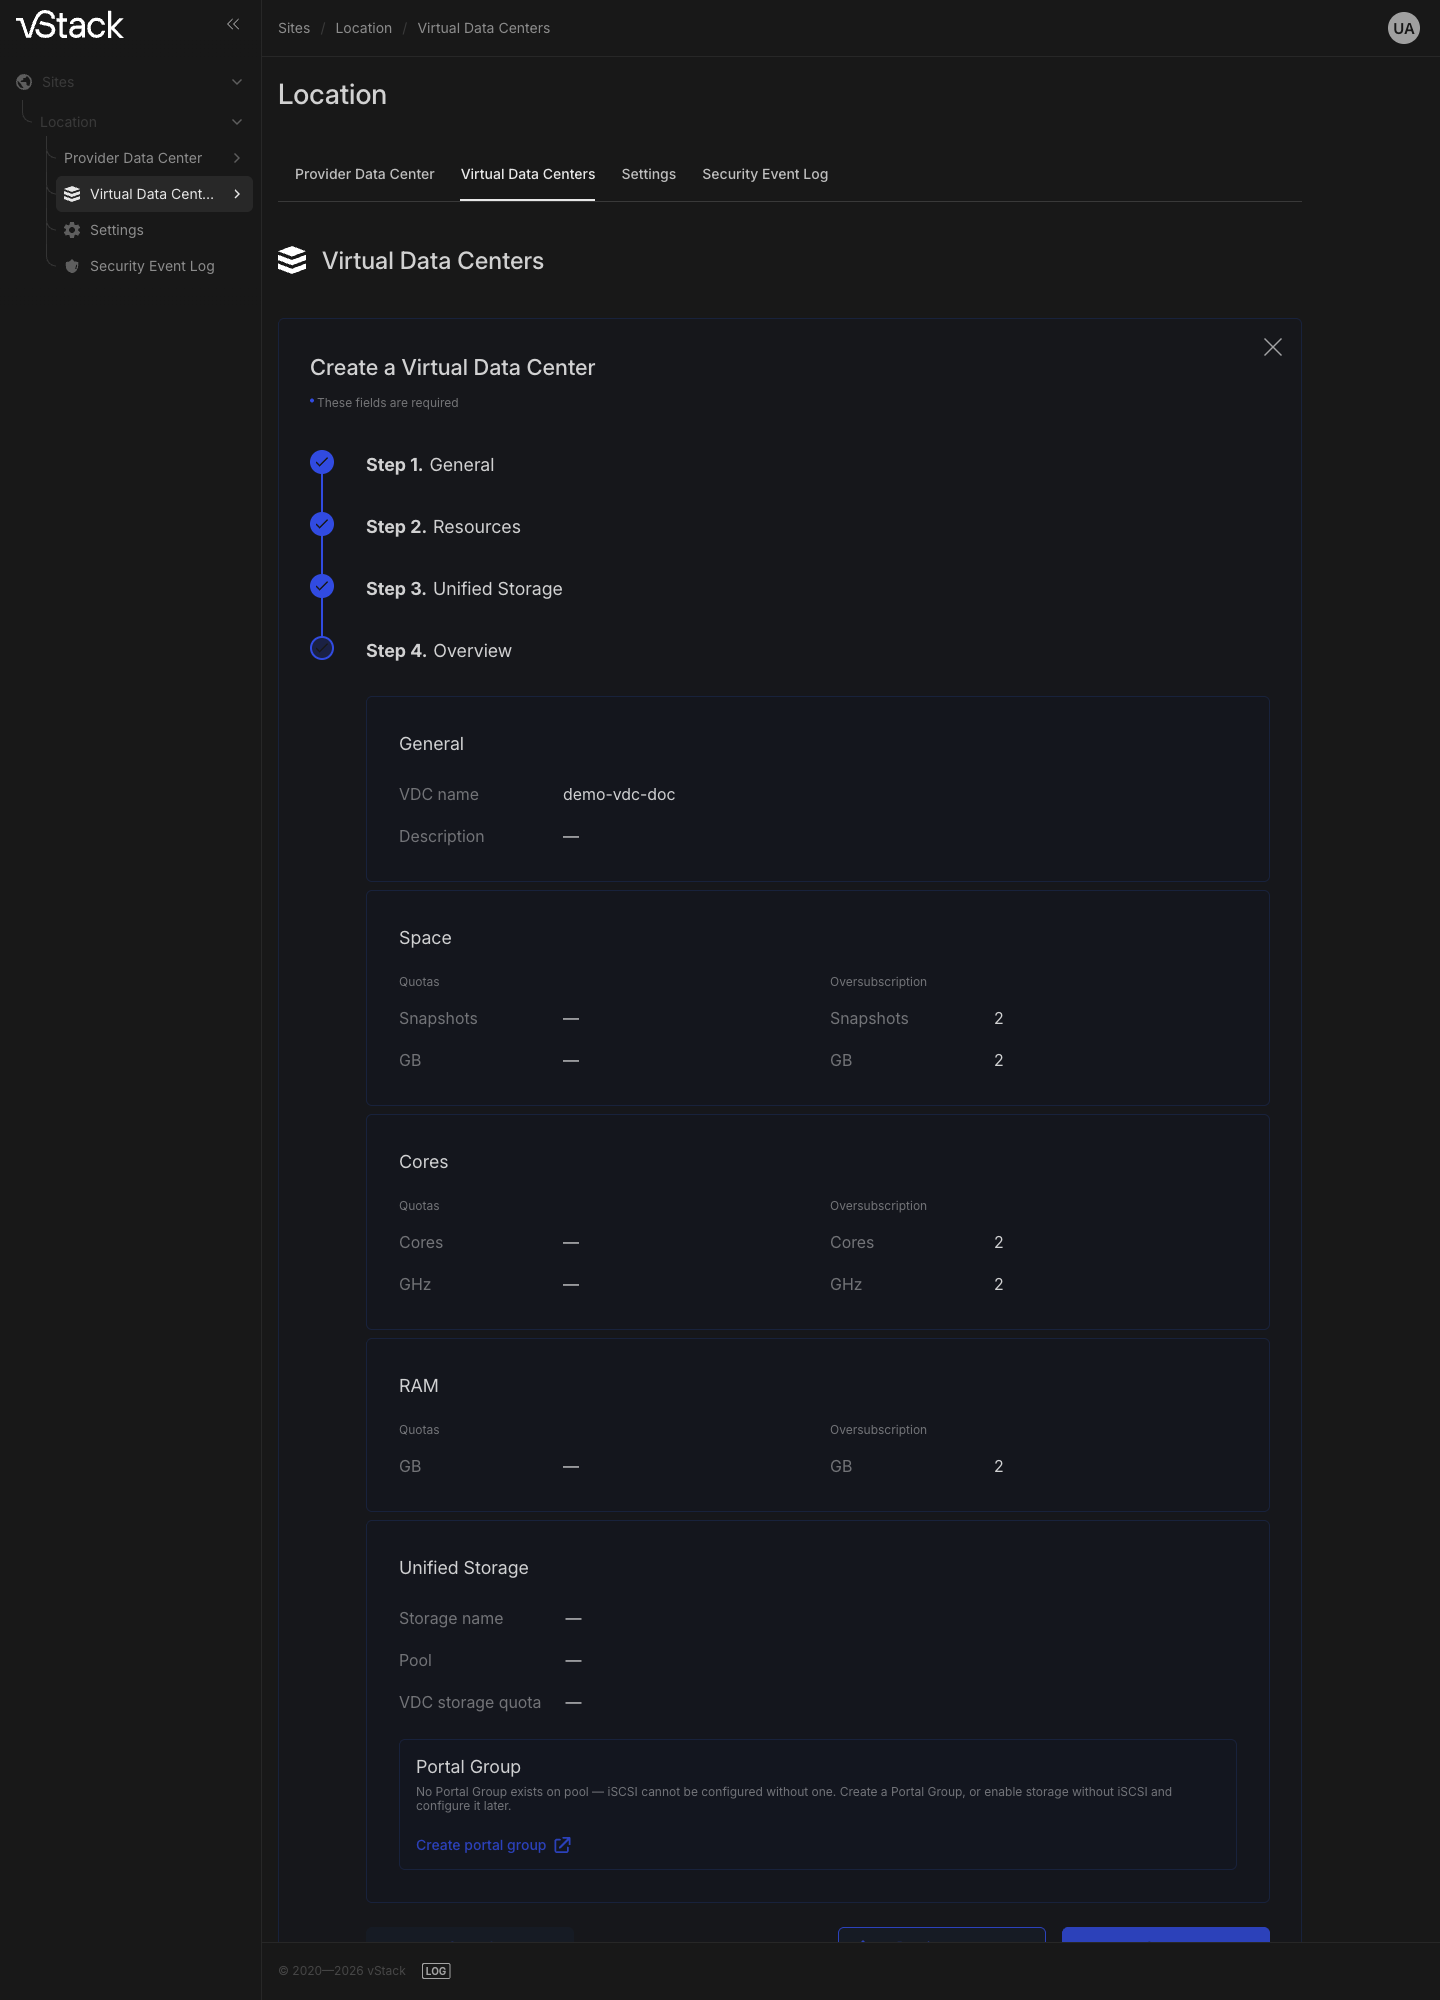
Inputs accepted by the wizard:
| Wizard field | Step | Required | Constraints |
|---|---|---|---|
| VDC name | General | Yes | 1–255 characters long |
| Description | General | No | Up to 1024 characters long |
| Quotas | Resources | No | An empty field means no limit is set for the resource |
| Oversubscription factors | Resources | No | An empty field means oversubscription is not set |
The full list of quotas and factors is in the VDC quotas and resources reference.
Modifying a VDC
Make changes in the Settings section on the VDC card. Each field is edited separately, so a partial update does not overwrite the other values.
| Goal | Action in the form |
|---|---|
| Leave a value unchanged | Leave the field untouched |
| Remove a limit (make it empty) | Clear the field |
| Set a new value | Enter the value |
- Open the VDC card: in the sidebar tree, select Virtual Data Centers → the VDC name. The card header shows the VDC name, with an ID: <identifier> button next to it.
- Scroll to the Settings section. The current quota summary is shown above on the card; the Settings section is specifically for editing.
- Edit the form fields by group:
- General: Name, Description.
- Quotas: CPU, RAM (GB), Storage (GB).
- Oversubscription factor: CPU, RAM, Storage.
- Secondary limits: CPU frequency, Snapshots.
- Click Save changes. The Save changes and Cancel buttons are disabled until the form has changes. A disabled button means there is nothing to change yet.
Clearing a quota field removes the limit: "∞" appears in place of the quota in the VDC list. An untouched field keeps its previous value, so edit only the values you actually want to change.
The Name and Description fields have stricter limits when editing than in the creation wizard: the name is limited to 64 characters, and the description to 512. Editing does not accept an empty name or a name consisting only of spaces. A name longer than 64 characters cannot be saved, so for a VDC created with a long name, set a shorter name the first time you edit it.
Deleting a VDC
If VDC storage is enabled, deletion becomes a long-running operation. Before storage teardown, vStack Center checks only the number of volumes. While volumes remain, deletion is rejected and storage is left untouched. Once no volumes remain, the controllers sequentially remove the iSCSI target, portal groups, initiator groups, CHAP credential sets, and root ZFS dataset. Teardown is irreversible. The result is returned when it finishes. Without enabled storage, deletion is immediate.
vStack Center checks the remaining relationships only after storage teardown: assigned networks, ports, VMs, datasets, and owned OS images. Images that are only visible to this VDC through a visibility grant do not block deletion: the grants are removed automatically.
A rejection at any of these later checks leaves the VDC in place, but its storage has already been torn down: the target, portal groups, initiator groups, CHAP credential sets, and root dataset have been removed, and rollback does not restore them. Remove networks, ports, VMs, datasets, and owned images from the VDC before clicking Delete VDC. After such a rejection, enable and configure storage again.
- Open the VDC card.
- Click Actions and select Delete VDC.
- Verify that the VDC disappears from the Virtual Data Centers table and the navigation tree in the sidebar.
Removing owned image blockers
The "VDC has owned OS images" rejection provides a ready-made task list: vStack Center lists the images that block deletion, with their names and the state of their copies across pools. To remove the blockers:
- Find the owned images in the OS images section. Each image shows its owner, so you can identify which images belong to this VDC.
- Delete each image. There is no bulk operation; images are deleted one at a time.
- Retry VDC deletion.
Retrying after a storage failure
Storage teardown proceeds in steps, and each completed step is saved. On a timeout or controller failure, the VDC remains in place, and another deletion attempt completes the remaining teardown. There is no need to start from scratch.
Verifying the result
Check the entries in the Virtual Data Centers table and on the VDC card:
- After creation, the VDC appears as a row in the table, and Running VMS and both usage columns show zeros; for a VDC without a quota, the second value is "∞".
- After editing, the new value is visible in the card summary, in the Quotas, Oversubscription, and Limits rows, and in the CPU, Memory, and Storage indicators labeled with the current quota.
- After deletion, the row disappears from the table and the navigation tree in the sidebar.
Troubleshooting
| What you see | Why | Action |
|---|---|---|
"Access denied" (-403) | Create a VDC was run without the Cluster master role | Sign in with a cluster-level role |
DB error during creation (-2004) | Writing the VDC to the database failed | Retry creation; if the error recurs, collect the message text and contact support |
"No params at all", "No param id", "No vdc_params has been provided" (-2002, -3301, -3305, -3402) | The operation reached the cluster without required data, which can happen when bypassing the web interface | Repeat the operation from the interface; if the message recurs, contact support |
"Access denied" (-403) when editing a VDC | Editing is available only to Cluster master | Sign in with a cluster-level role |
"VDC name must not be null or empty" (-3306) | The Name field was cleared or contains only spaces when editing | Enter a nonempty name and save again |
"VDC name must not exceed 64 characters" (-3307) | The name is longer than 64 characters when editing, although the creation wizard accepts up to 255 | Shorten Name to 64 characters |
"VDC description must not exceed 512 characters" (-3308) | The description is longer than 512 characters when editing, although the creation wizard accepts up to 1024 | Shorten Description to 512 characters |
"Access denied" (-403) when deleting a VDC | Deletion is available only to Cluster master | Sign in with a cluster-level role |
"VDC not found" (-3405) | The VDC has already been deleted, or the open card is outdated | Refresh the Virtual Data Centers tab and retry |
"VDC has assigned networks" (-3406) | Assigned networks remain in the VDC | Remove the assignment on the Networks tab → Primary, Assign column |
"VDC has assigned ports" (-3407) | VDC networks have ports | Disconnect VMs from the VDC networks, then unassign the networks |
"VDC has assigned VMs" (-3408) | The VDC contains virtual machines | Delete or move the VMs on the Virtual Machines tab of the VDC card |
"VDC has assigned datasets" (-3409) | Datasets remain in the VDC | Delete the datasets |
"VDC has assigned volumes" (-3411) | SDS storage volumes remain in the VDC | Delete the volumes first, then the VDC |
"VDC has owned OS images" (-3412) | The VDC owns OS images | Remove the blockers for the listed images |
"Storage teardown timed out: <step>" (-45020) | The controller did not respond within the allotted time at a storage teardown step | Retry deletion: completed steps have been saved, and the retry finishes the remaining teardown |
"Storage teardown failed: <step>: <message>" (-45021) | The controller failed at a storage teardown step | Identify the cause from the message text, resolve it, and retry deletion |
API methods
The API operations covered on this page are vdc-create, vdc-set, vdc-delete, vdc-list,
golden-images-list, and golden-image-remove. See the API
reference.