Quick start: from sign-in to your first virtual machine
What you will achieve
Five steps take you from an empty cluster to a machine whose console you can access: sign in to the web UI → VDC → network in the VDC → VM → start and open the console. The sequence follows vStack Center's own checks: a VM can be created only in a VDC, a network port only in a network assigned to that VDC, and a disk only on a pool that holds the selected OS image.
The entire procedure takes place in the web UI. Each step uses a navigation section, the Actions button, and a form. The same operations are available programmatically: the method list is at the end of the page.
The components and protocol are described in What is vStack Center.
Prerequisites
- The Cluster master role. Other roles cannot create VDCs. A
vDC admincan also assign a network to their VDC if they created that network themselves. AvDC admincan create a VM within an existing VDC. - The cluster has a network, a storage pool, and an OS image distributed to that pool.
- vStack Center version 3.0.5.
Access requirements for each step are collected in the table below. Check them before you start.
| Step | Who can perform it |
|---|---|
| Create a VDC | Cluster master only |
| Assign a network | Cluster master, or a VDC administrator who created the network themselves |
| Create a VM | Cluster master — in any VDC; other users — with the vDC admin or VM Developer role in the required VDC |
| Start a VM | Cluster master — any VM in the cluster; other users — VMs in their VDC with the vDC user role or higher |
| Open the console | Cluster master — any VM in the cluster; other users — VMs in VDCs where they have the vDC admin, vDC user, or vDC viewer role |
Step 1. Sign in to the web UI
Open the web UI at the cluster's HTTPS address, for example
https://cluster.example.com. Enter the username and password provided by the
cluster administrator.
If the account requires a forced password change, the web UI immediately prompts you to set a new password. The other sections are unavailable until the password is changed. You have 5 minutes to change it; after that, you must sign in again.
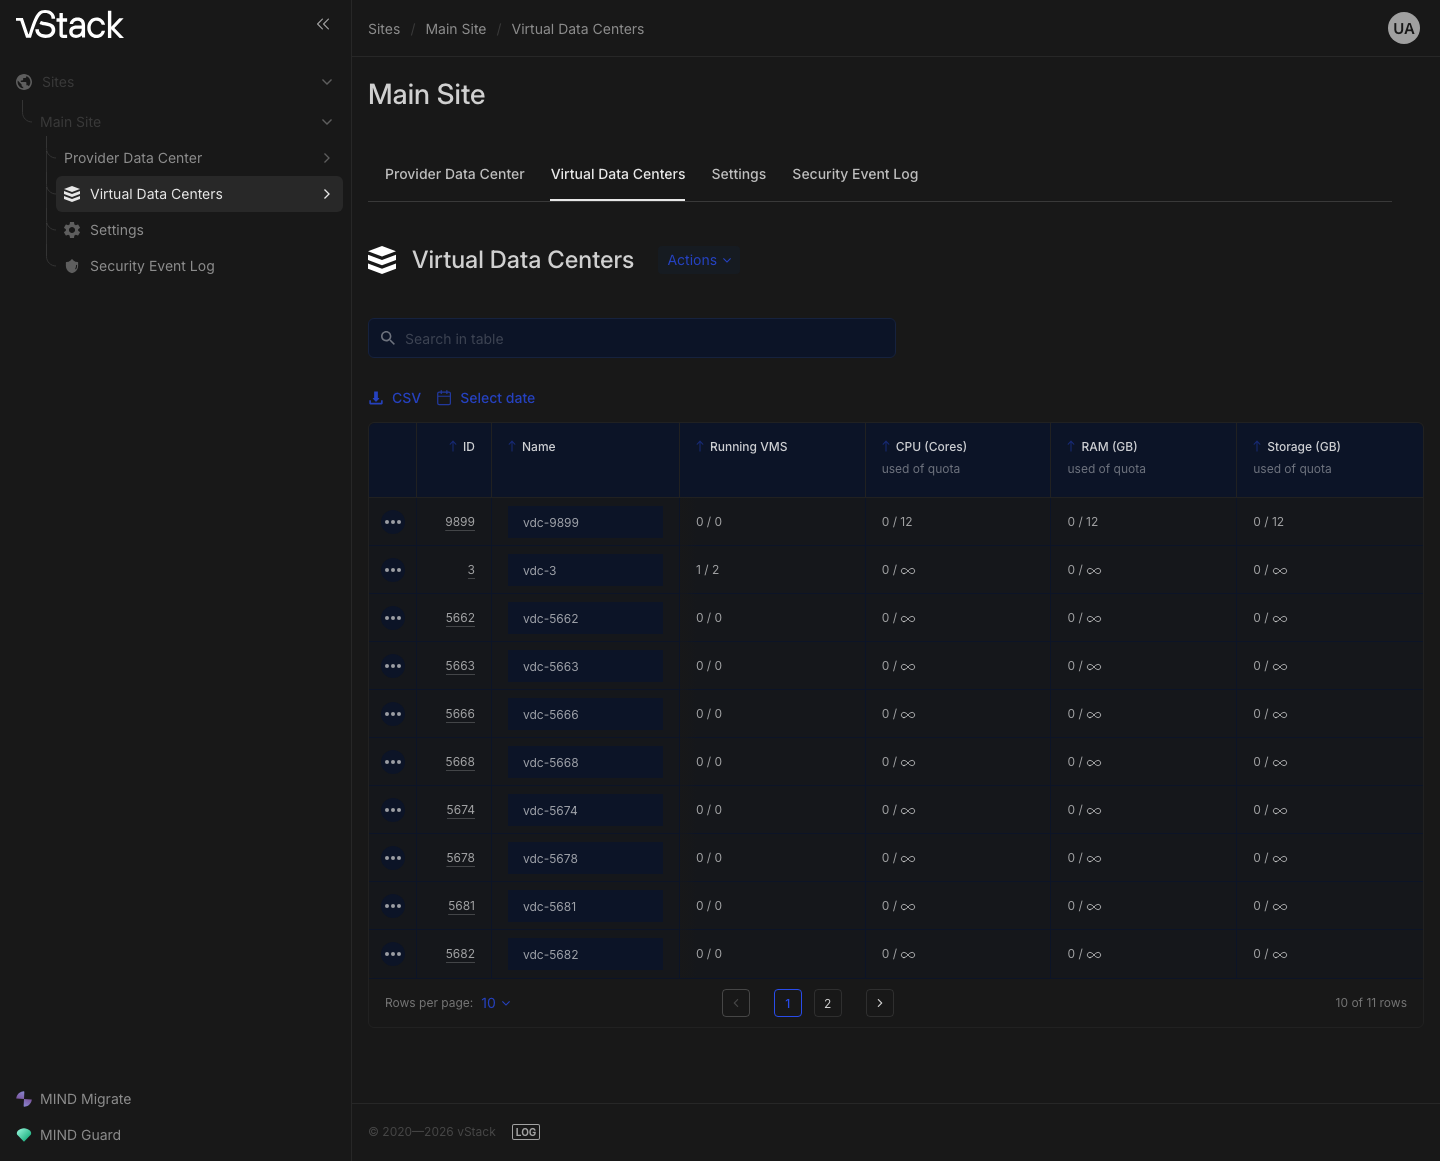
Verify that sign-in succeeded. The side navigation displays the site tree: Provider Data Center, Virtual Data Centers, Settings, and Security Event Log. Open Virtual Data Centers to see the VDC table with the ID, Name, and Running VMS columns and three used of quota values for CPU, RAM, and storage. On a fresh cluster, the table is empty; this is expected.
If it does not work
| Symptom | Reason | What to do |
|---|---|---|
| The web UI requires a new password immediately after sign-in | The account has the forced password change flag set | Set a new password in the form; the other sections become available after that |
| The sign-in form reappears even though the password is correct | Access before a password change lasts 5 minutes and has expired | Sign in again and complete the password change |
| The Virtual Data Centers section is empty | The cluster does not have any VDCs yet | This is expected on a fresh cluster; proceed to step 2 |
Step 2. Create a VDC
A VDC is a unit of ownership and accounting. Quotas, networks, roles, and VMs are linked to it, so it is created first. You can leave quotas unset initially: an empty quota field imposes no limit.
- Open Virtual Data Centers in the side navigation.
- Click Actions and select Create a VDC to open the Create a Virtual Data Center wizard.
- Enter a name in the first step. The cluster checks only its length: 1 to 255
characters. The hint below the field says Alphanumerics, but hyphens and
underscores are also accepted, for example
vdc-test. The Next step button becomes available when the field is filled in. - Complete the remaining wizard steps: Resources, with CPU, RAM, and storage quotas, Unified Storage, and Overview. Confirm creation in the last step.
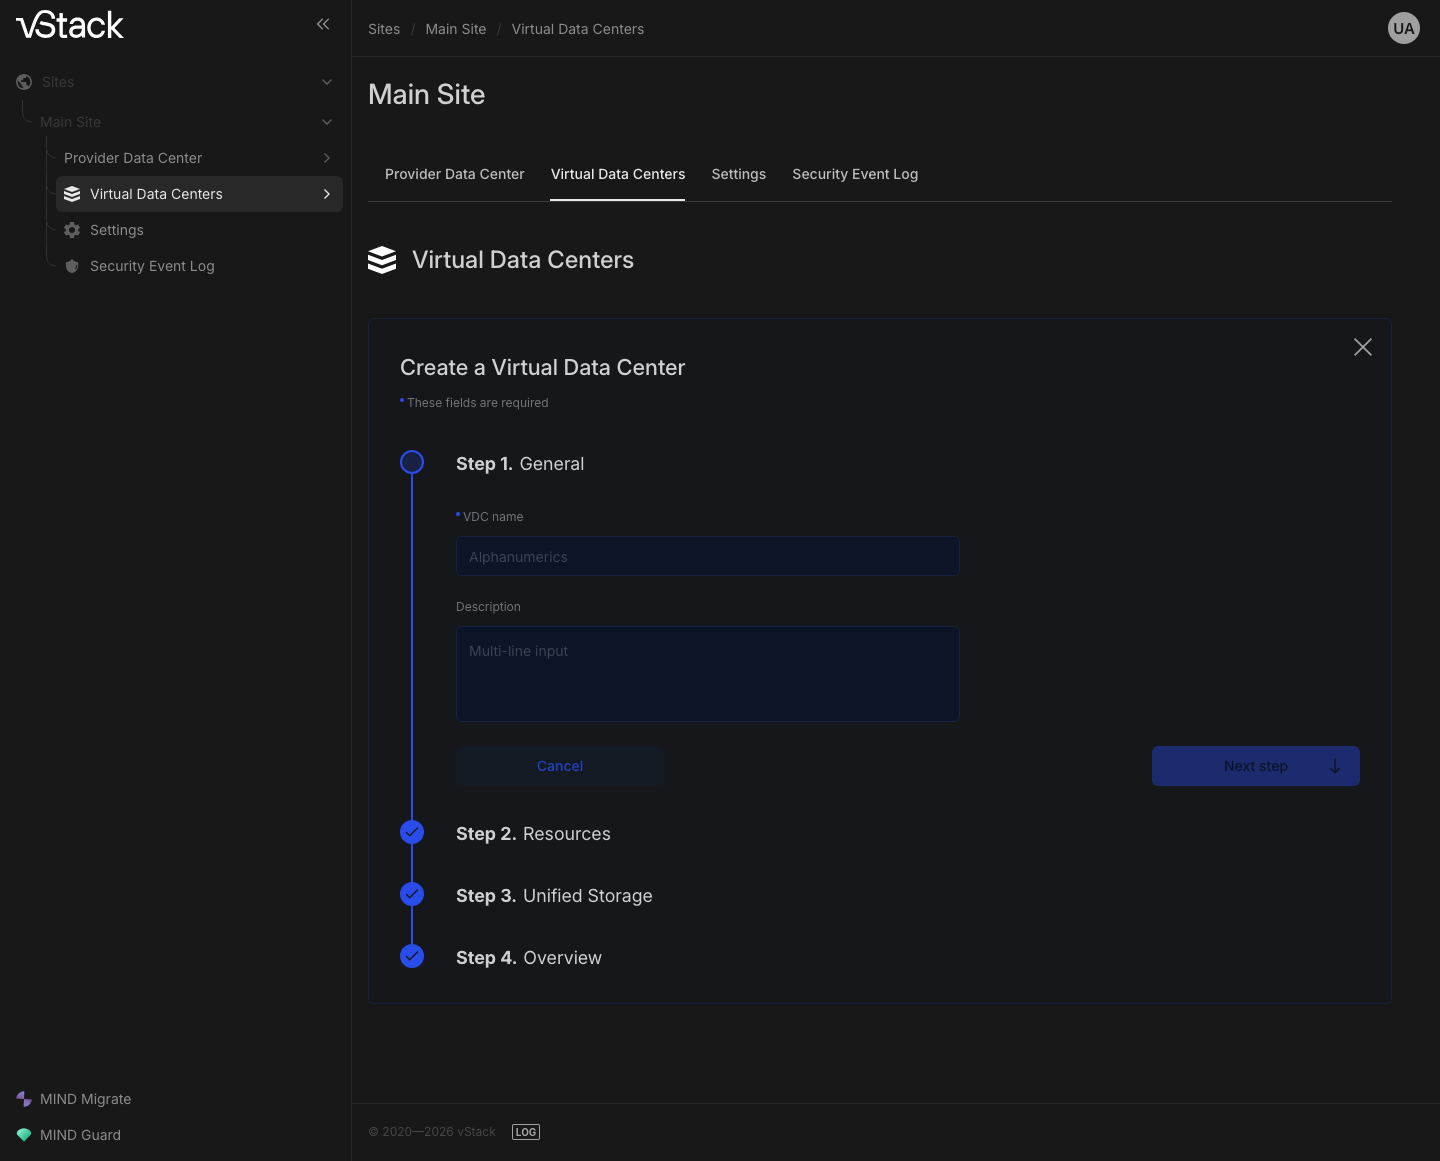
Verify the result. The new VDC appears in the Virtual Data Centers table with its own ID and a zero in Running VMS. Click its name to open its card: an ID: <number> button appears next to the title, and the form on the VDC tab shows the configured values in the General, Quotas, Oversubscription factor, and Secondary limits sections.
You can change quotas on the same card: edit the fields in Quotas and click Save changes. An empty field removes the limit.
If it does not work
| Symptom | Reason | What to do |
|---|---|---|
Create a VDC is unavailable, or creation is rejected with code -403 | Only the Cluster master role can create VDCs | Perform this step with a cluster-level account |
| The Next step button remains unavailable | The name is empty or longer than 255 characters | Enter a name with 1 to 255 characters |
| Quotas need to be changed after creation | The wizard sets quotas once | Edit them on the VDC card: Quotas section → Save changes |
Step 3. Assign a network to the VDC
A VM can receive a network port only in a network assigned to its VDC. Otherwise, VM creation stops at the network membership check. Networks themselves exist at the cluster level: Cluster master creates them and then assigns them to VDCs.
-
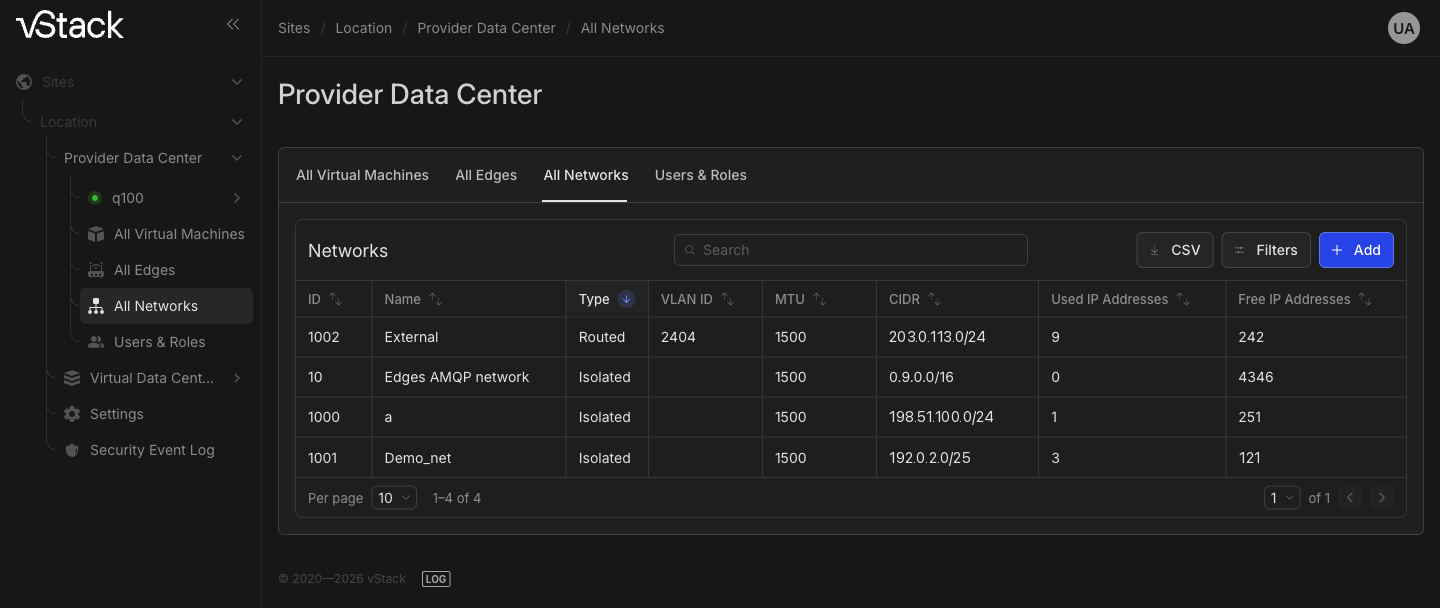
Cluster network: open Provider Data Center → All Networks tab. The network table has the ID, Type, Name, VLAN ID, MTU, CIDR, Used IP Addresses, and Free IP Addresses columns. If the required network is missing, use the Add button above the table.
-
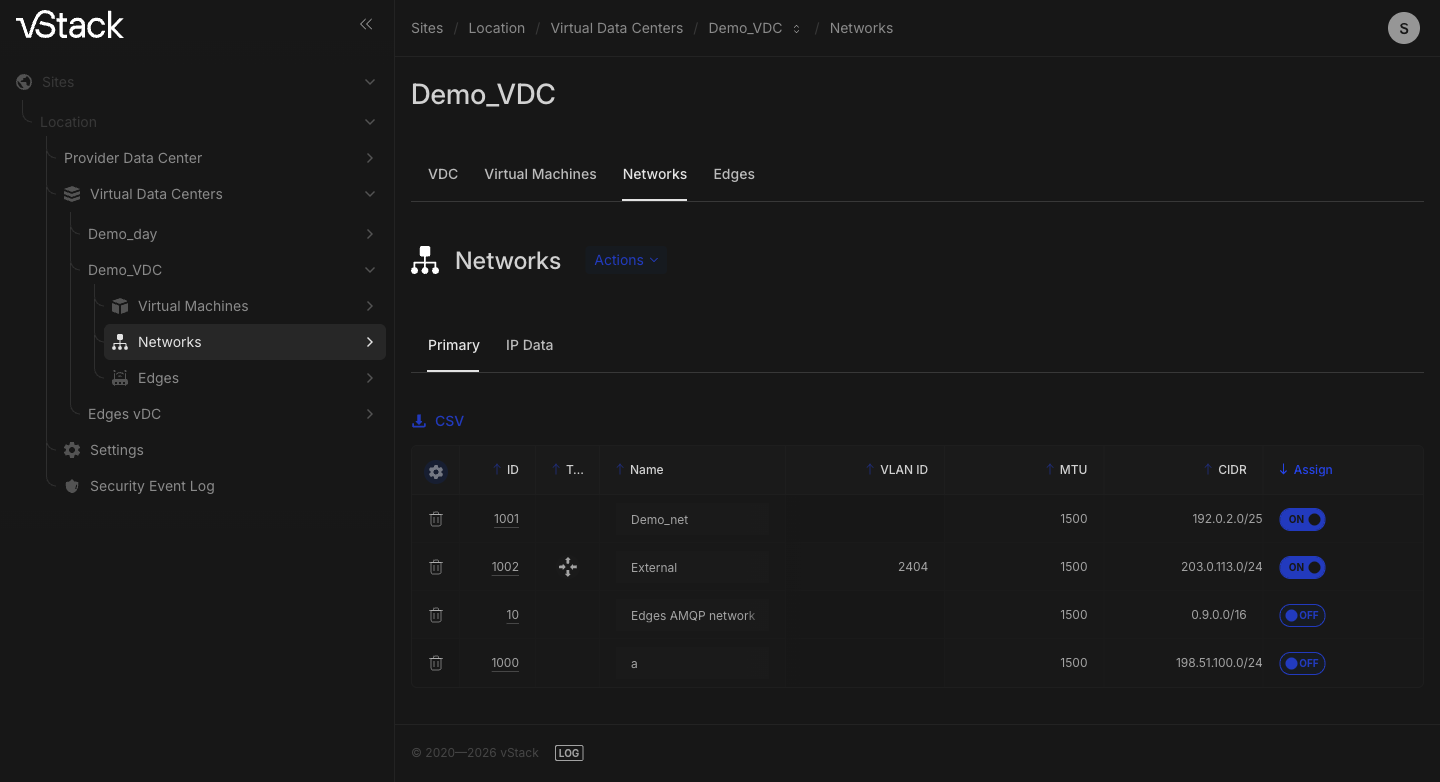
VDC assignment: open the VDC card, go to the Networks tab and the Primary subtab, and select the required network in the Assign column of the network table.
-
The IP Data subtab shows address capacity: Used IP addresses by this vDC, Used IP Addresses, Free IP Addresses, and Addrs limit.
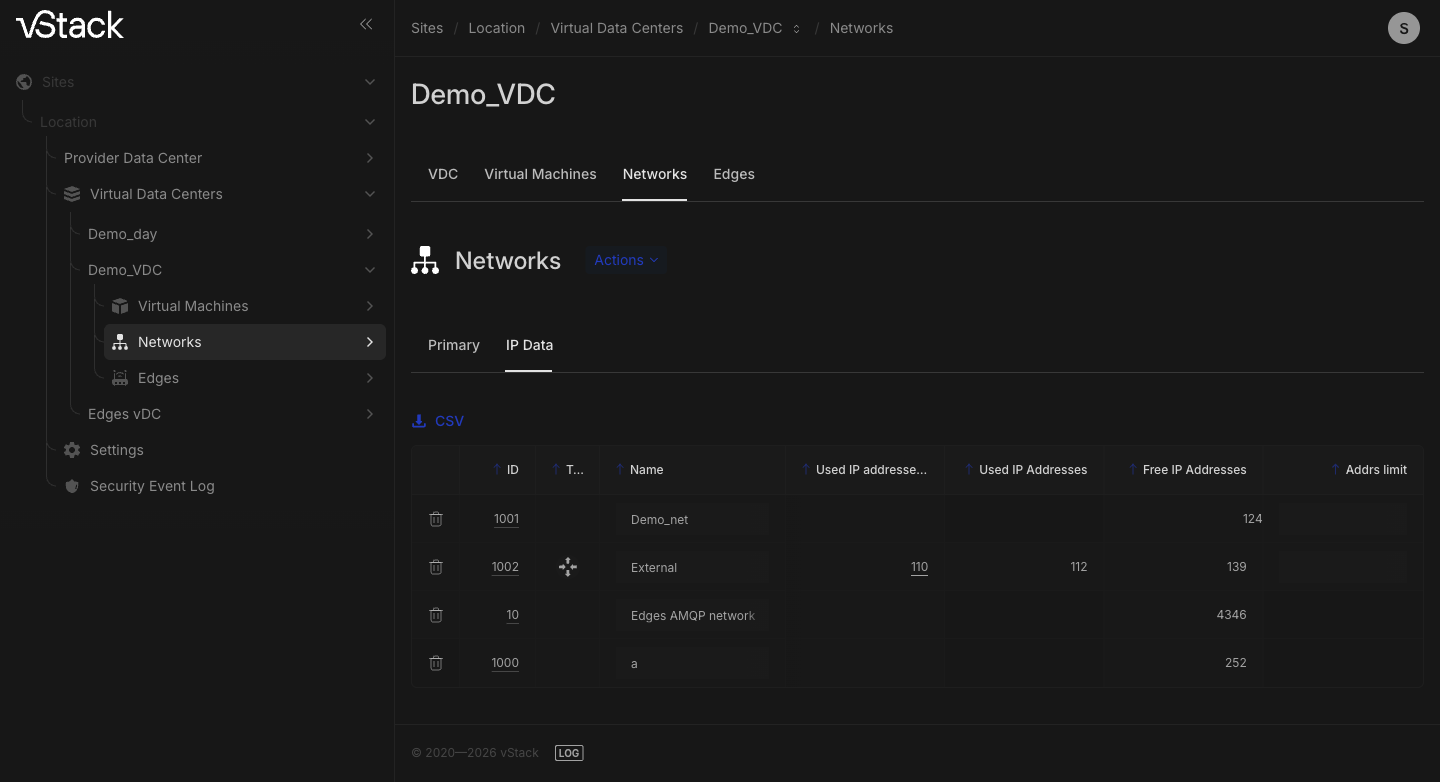
Verify the result. Assign remains selected, and the row shows the network parameters: CIDR, MTU, and VLAN ID. On the IP Data subtab, free addresses are available for the VDC↔network pair. The VM will receive one of them.
You can limit the address capacity of the VDC↔network pair with Addrs limit on the same subtab. There is no limit by default, and only Cluster master can change it.
If it does not work
| Symptom | Reason | What to do |
|---|---|---|
The Assign selection is not saved, code -2108 | In addition to VDC permissions, vStack Center requires that the same user created the network | Assign the network with a cluster-level account |
The required network is missing from the list, or code -2120 is returned | The cluster has no network with that ID | Create the network on the All Networks tab and retry the assignment |
Assignment is rejected with code -403 | The account has no permissions for this VDC, or its role is below VDC administrator | Obtain the vDC admin role in the target VDC |
The network cannot be unassigned from the VDC, code -2206 | The network still has ports used by VMs | First delete or reconfigure the machines that use it |
Step 4. Create your first VM
Creating a VM involves more than a single database write. vStack Center validates the parameters, selects a storage pool, creates disks and network interfaces, allocates addresses and console ports, and then hands the work to the Storage agent and VM agent on the node. The wizard therefore does not confirm creation instantly: wait for the machine to appear in the table.
- Open the VDC card, click Actions, and select Create a VM to open the Create a Virtual Machine wizard. The same option is available in Provider Data Center → All Virtual Machines tab.
- Enter a name: the first character must be a Latin letter or digit; subsequent
characters can be letters, digits, periods, underscores, and hyphens. The
maximum length is 128 characters. For example,
test-vm-01. - Check the selected VDC and placement method. The default is Least-loaded storage pool: vStack Center selects the least full pool among those with an active copy of the selected image. Select a specific pool only when you need it: it must contain an active copy of the image.
- Fill in the numeric resource fields: vCPU and memory size. Use the GB button to switch units. Memory must be at least 512 MB. The first disk must be at least the minimum size of the selected OS image; 10 GB is sufficient for a typical cloud image.
- Select an OS image and a network. The network list contains only networks assigned to this VDC in step 3. Fill in the guest configuration: a hostname is required for any guest, and Windows also requires an administrator password.
- Use Next step to complete the wizard and confirm creation.
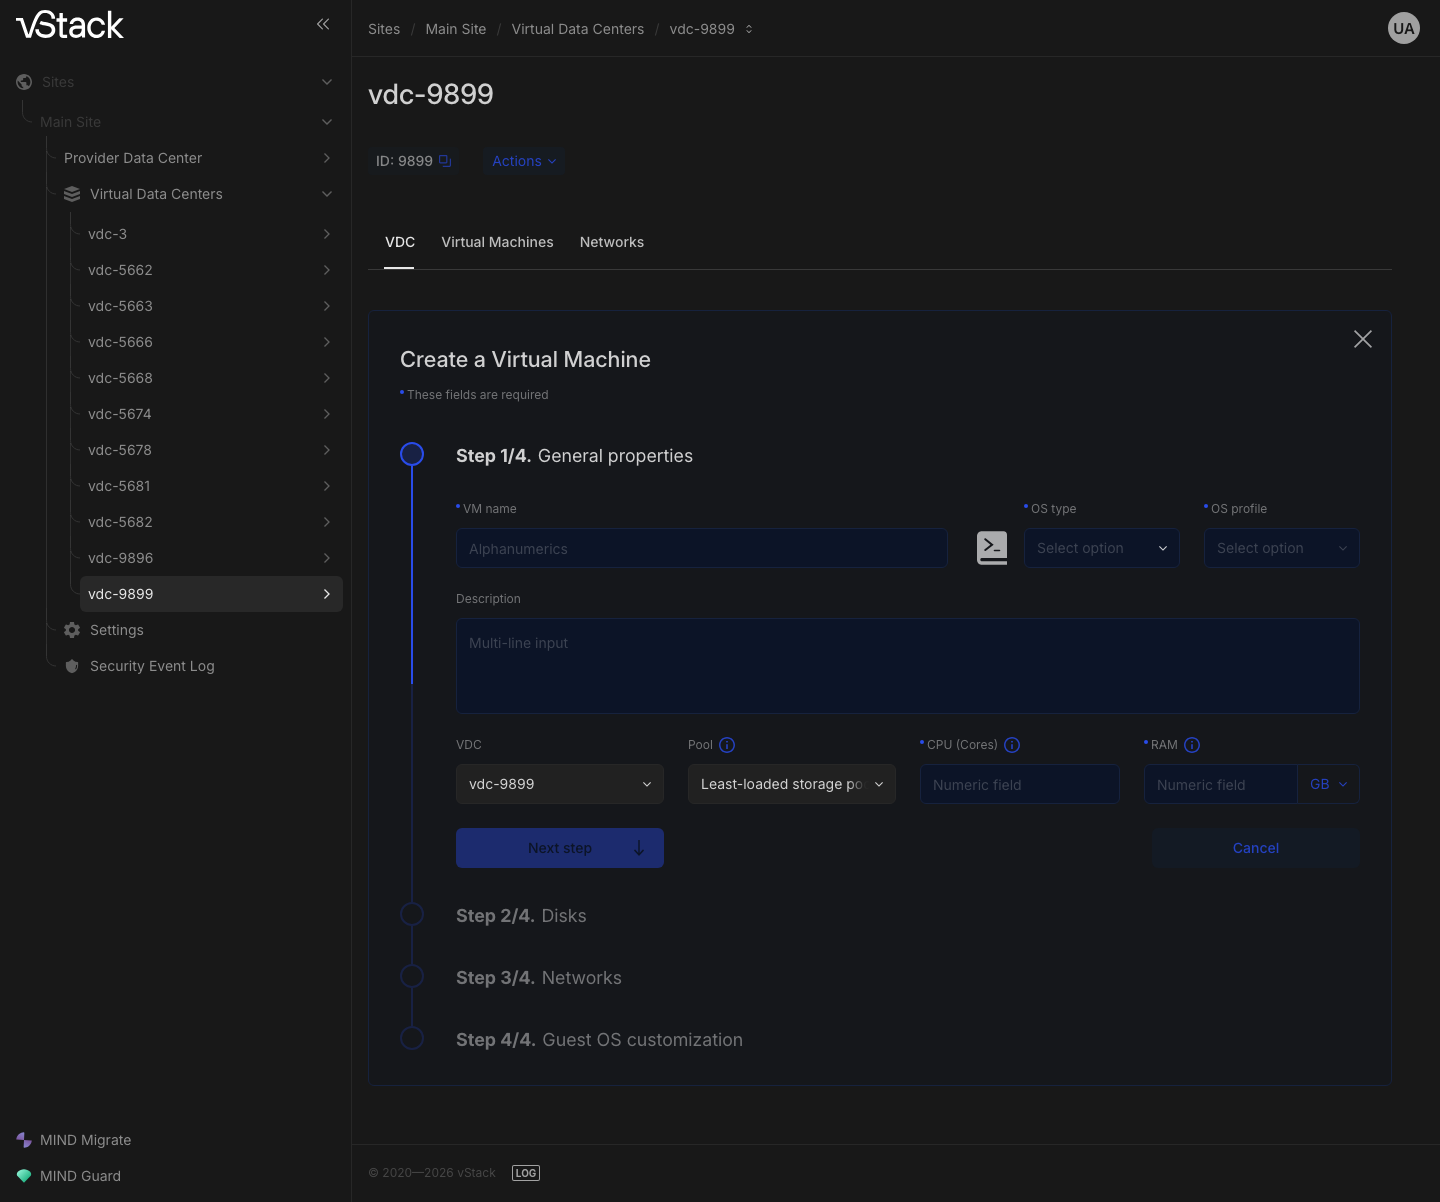
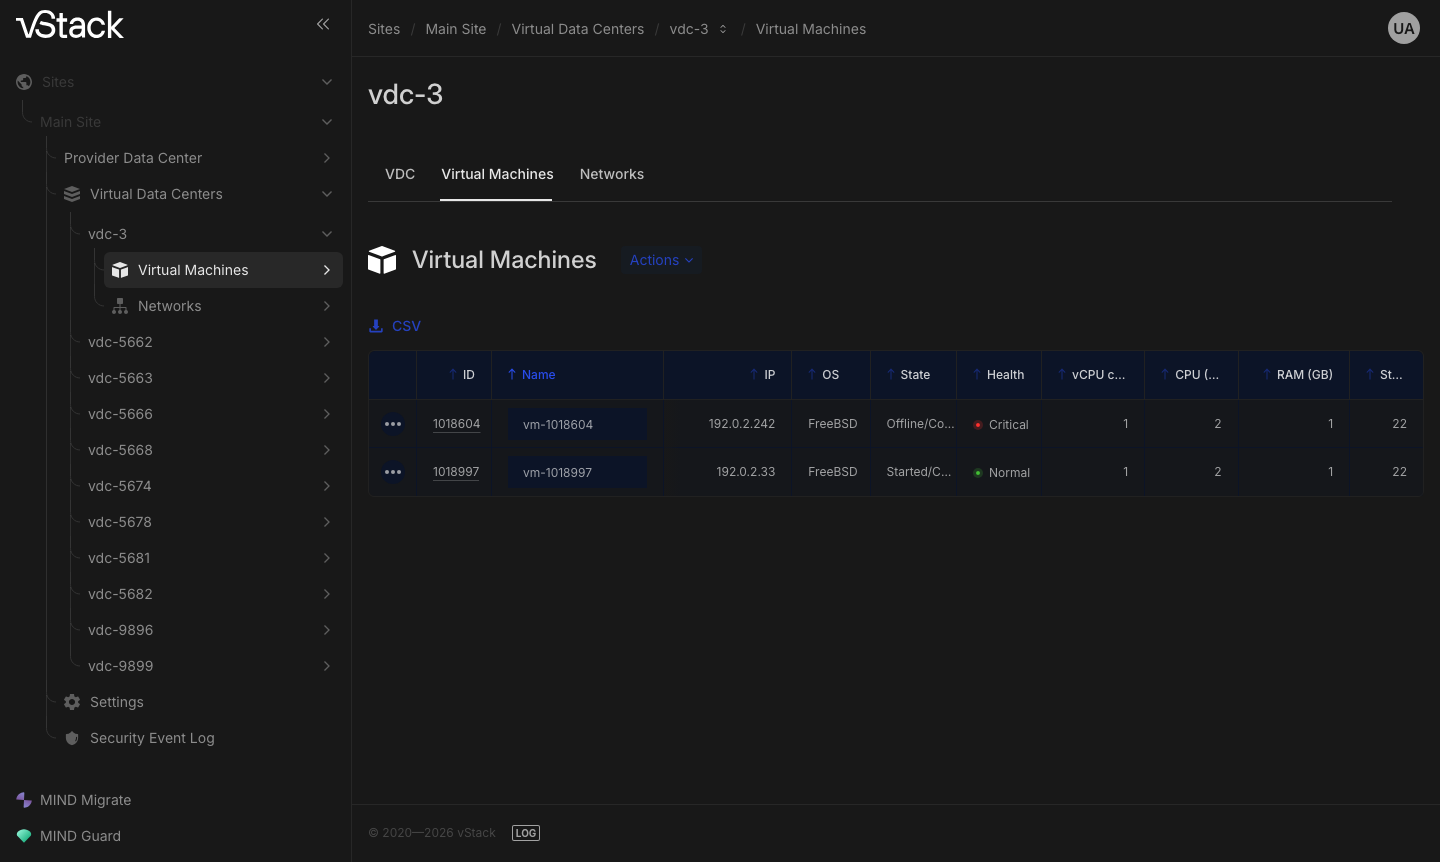
Verify the result. The machine appears on the Virtual Machines tab of the
VDC card: its own ID, the assigned address in IP, the image in OS,
and its state in State. The machine is locked during initial configuration.
Each action in Actions has its own error code for a lock: start, stop, and
restart — -409 ("VM is locked"), delete — -309, edit settings — -3219,
add disk — -3448, remove disk — -4430, resize disk — -7128, snapshot —
-3630, delete snapshot — -4330, roll back to snapshot — -4230, suspend and
resume — -15015. Wait for the lock to be released, then proceed to startup.
If it does not work
| Symptom | Reason | What to do |
|---|---|---|
The selected OS image is "not found," code -256 | The image is private to another VDC: vStack Center does not disclose the existence of another VDC's image | Use a cluster-shared image or request access to the required image for your VDC |
The image has not been distributed to the selected pool, code -259 | The specified pool has no active copy of the image | Keep Least-loaded storage pool — automatic selection accounts for the image distribution map — or specify a pool that has a copy |
The first disk is smaller than the minimum, code -254 | A cloud image cannot be deployed to a disk smaller than its minimum size | Increase the first disk size to the minimum required by the selected image |
Creation is rejected with code -262 | A port was requested in a network that is not assigned to this VDC | Return to step 3 and assign the network |
The memory size is rejected, code -229 | Memory is counted in 4 KiB pages, so the value must be a multiple of 4096 bytes | Set a whole number of gigabytes or a number of megabytes that is a multiple of 4 |
The VDC storage quota is exhausted, code -213 | The total disk size exceeds the quota | Reduce the disk size or increase the quota on the VDC card |
Windows VM creation is rejected with code -233 or -261 | A Windows guest requires an administrator password, and any guest requires a hostname | Complete all guest configuration fields |
Step 5. Start the VM and open the console
The created machine is not running yet. At startup, vStack Center checks access, VDC quotas, cluster overcommit, and the machine state, locks the machine, and sends the command to the VM agent. The response arrives after confirmation from the node; in the web UI, this appears as a delay before the state changes.
You do not need to select a node. vStack Center automatically places a machine with disks in NVMe mode on the least loaded running node in the cluster. A machine with virtio-blk disks starts only on the node hosting its data pool.
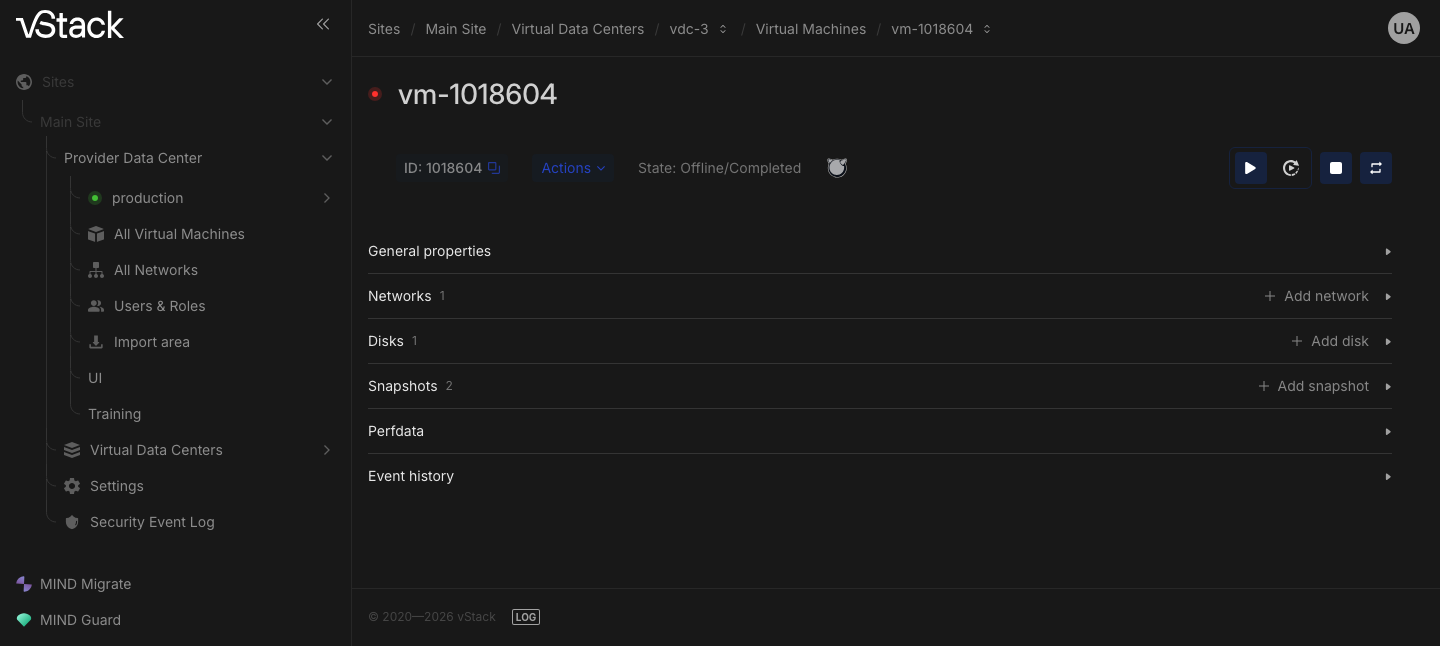
- Open the VM card from the Virtual Machines tab on the VDC card or from All Virtual Machines.
- Select the machine startup action in the Actions menu. The machine is locked for the duration of the operation.
- Wait for the state to change: check the State column in the VM table and the Node field on the card, which shows the node where the machine is running.
- Open the console from the same card. There are two console types: graphical (VNC), the default, and text. Opening the console resets the previous connection to the same machine, so any previously opened console window closes.
If it does not work
| Symptom | Reason | What to do |
|---|---|---|
Startup is rejected with code -457 | Only a stopped or newly created machine can be started, and this one is already running | Check the State column; resume a suspended machine (-455) instead of starting it |
virtio-blk VM: start only on the pool node, code -460 | The machine has disks in virtio-blk mode and starts only on the node hosting its data pool | Leave node selection automatic or specify the pool node |
Windows VM startup is rejected with code -459 | Initial configuration is incomplete, and startup was requested on a node other than the pool node | Complete configuration on the pool node, then start the machine on any node |
No nodes are available for placement, code -458 | No running node was found for automatic selection | Wait for nodes to return to the cluster and retry startup |
Codes -413, -414, -415, -440 | Startup adds the VM's resources to current usage and reaches the VDC storage, RAM, or core quota, or the cluster RAM overcommit limit | Free resources or increase the quota on the VDC card |
VM is locked, code -409 | Another operation is in progress on the machine, and it is locked for that operation | Wait for the operation to complete |
The console does not open, code -3103 | The machine is outside the account's visibility scope | Obtain a role in its VDC |
The console does not open, code -403 | The Access VM Console privilege is granted to Cluster master, vDC admin, vDC user, and vDC viewer; VM Developer does not have it | Obtain one of the listed roles in this VDC |
Verify the result
Open the VDC card and the Virtual Machines tab. The table has the ID, Name, IP, OS, State, Health, vCPU class, CPU (Cores), RAM (GB), and Storage (GB) columns. Your machine appears in the list with an assigned address and a running state.
The machine's own card provides the rest: General properties with the Node, OS profile, and VDC fields, the Networks, Disks, and Snapshots sections, Perfdata charts, and Event history, a log of machine operations with the status, time, and duration of each.
See also
- vStack Center architecture, protocol, and roles — What is vStack Center.
- Individual VM methods — VM management methods.
- Who can access what — Roles and privileges.
- If the console does not open — VNC console does not open in troubleshooting.
API methods
The operations on this page are available through the API: vdc-list,
vdc-create, vdc-set, vdc-assign-network, vdc-deassign-network,
vdc-networks, vdc-network-addr-limit, vms-create, vms-start, vms-resume,
vm-console, vm-list — see the API reference.